You’re probably dealing with a familiar production problem right now. Parts need to be more consistent, operators are stretched, quality wants tighter control, and capital budget won’t support a full jump to complex automation.
That’s where the three axis milling machine keeps proving its value. Not because it’s flashy, and not because it can do every geometry in one setup. It matters because it solves a large share of real shop-floor work with predictable precision, manageable programming, and a practical path to semi-automation.
For manufacturers trying to improve throughput without overbuilding the process, a three axis mill is often the right center of gravity. With the right fixtures, tooling, controls, and validation approach, it becomes more than a machine tool. It becomes a repeatable production platform.
Table of Contents
- The Workhorse of Modern Manufacturing
- Understanding 3-Axis Milling Principles
- Selecting the Right 3-Axis Mill for Your Needs
- Beyond Standalone Machines Integrating for ROI
- When to Choose 3-Axis Over 4-Axis or 5-Axis Milling
- Maximizing Your Investment in Milling Automation
- Frequently Asked Questions
The Workhorse of Modern Manufacturing
A production manager gets a drawing package on Monday, a quality complaint on Tuesday, and a budget warning by Friday. The parts are not especially exotic. They have pockets, holes, flat faces, counterbores, and a few tolerance-critical features. What’s needed isn’t a moonshot. It’s a process that holds size, runs reliably, and doesn’t demand a complete rebuild of the department.
That’s the lane where the three axis milling machine still earns its place.
Why it still matters on the shop floor
A lot of buyers treat 3-axis as the “basic” option. That’s usually the wrong framing. In practice, it’s the machine category that covers a broad range of production work without forcing unnecessary complexity into programming, maintenance, fixturing, or training.
That doesn’t make it limited. It makes it useful.
Historically, milling started with exactly this problem: how to make interchangeable parts reliably enough that production could scale. Eli Whitney’s first milling machine in 1818 was developed in response to a government order for 10,000 muskets, giving less skilled operators a way to produce identical parts and helping establish cost-effective mass production principles that still matter in semi-automated manufacturing today, as documented in this historical review of Whitney’s milling machine development.
What operations teams actually gain
When a shop moves from manual variability toward controlled milling, the biggest gain usually isn’t theoretical capability. It’s process discipline.
That shows up in practical ways:
- More predictable output: The machine follows the same programmed path every cycle.
- Better staffing flexibility: The process depends less on one highly experienced operator “feeling” the cut.
- Cleaner handoff to quality: First-article approval means more when the machine can repeat the same motion reliably.
- A stronger upgrade path: Fixtures, probing, loading aids, and controls can be added without replacing the whole manufacturing concept.
Practical rule: If most of your parts can be machined from the top with stable workholding, don’t dismiss 3-axis as entry-level. Treat it as a production platform.
For teams looking at targeted process upgrades rather than all-at-once automation, the best next step is usually not a more complicated machine. It’s a smarter manufacturing cell built around the right one. That’s also why many engineers keep returning to practical integration examples and shop-floor upgrades discussed across the wider manufacturing conversation at SEA’s blog.
Understanding 3-Axis Milling Principles
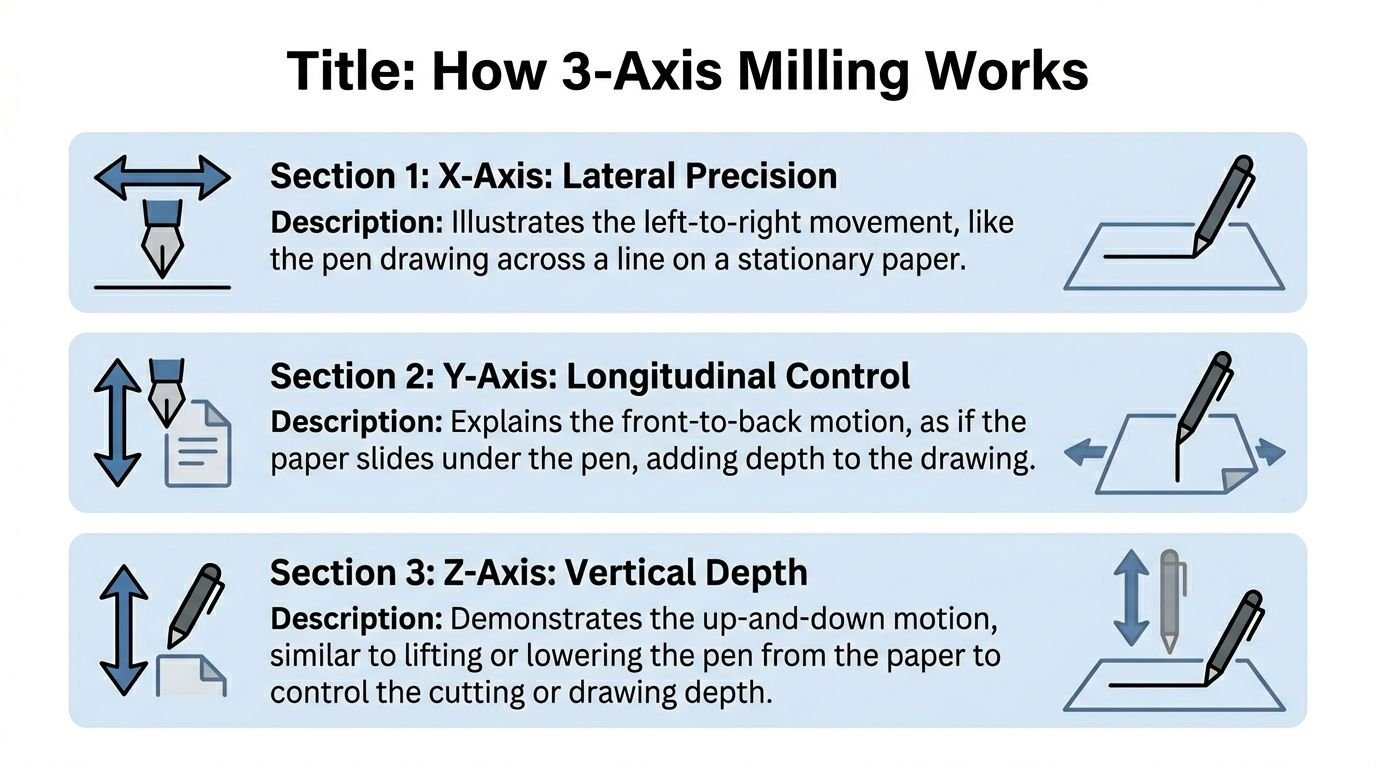
A three axis milling machine moves in three straight directions. X is left to right. Y is front to back. Z is up and down. This describes the whole motion system.
The easiest way to picture it is a pen over paper. The pen moves left and right, the paper shifts forward and back, and the pen lifts or lowers to control contact depth. Milling works on the same idea, except the pen is a rotating cutter and the paper is a metal or plastic workpiece.
How motion becomes a finished part
The machine doesn’t “know” the part by itself. It follows a digital chain that starts well before the spindle turns.
CAD model
An engineer creates the geometry. This defines surfaces, hole locations, depths, and critical dimensions.CAM programming
CAM software converts that model into toolpaths. It decides where the cutter enters, how deep it cuts, and how it transitions between features.G-code output
The CAM package posts code the control can read. That code tells the machine where to move in X, Y, and Z, and when to change tools, start the spindle, or feed into material.Machining cycle
The machine executes those instructions repeatedly, which is where CNC separates itself from manual milling.
Why CNC changed the economics
Manual milling can produce excellent parts in skilled hands, but the process depends heavily on the operator. CNC shifted that dependence toward program control and repeatability.
The first 3-axis CNC mill, developed in 1952 with U.S. Air Force funding, used punch cards to control motion and reduced human error by up to 90%, enabling complex jet engine parts with a level of accuracy that manual processes struggled to match, according to this history of early CNC milling development.
That history still matters because the basic value proposition hasn’t changed. Shops adopt CNC for the same reasons now that aerospace did then: repeatable motion, fewer operator-driven deviations, and better control over complex sequences.
Good CNC work starts before cycle start. If the CAD is unclear, the CAM is rushed, or the workholding is unstable, the machine only repeats those mistakes faster.
What 3-axis does well
For many parts, the tool only needs to approach from above. That makes 3-axis a strong fit for:
- Flat-faced components
- Pockets and recessed features
- Hole patterns and bolt circles
- Slots, profiles, and edge details
- Prototype work that needs quick revisions
What it doesn’t do well is access hidden features, deep undercuts, or compound angles that need continuous tool orientation changes. That’s where extra axes begin to earn their keep.
For everything else, the 3-axis format remains one of the most practical ways to convert digital design into controlled physical output.
Selecting the Right 3-Axis Mill for Your Needs
Buying a three axis milling machine on price alone usually creates problems later. The cheaper machine can become the expensive choice if it struggles to hold position, fit your part envelope, or support the inspection and validation routine your process requires.
A better approach is to match machine capability to production intent. A prototype shop and a medical device production cell can both use 3-axis equipment, but they won’t evaluate the machine the same way.
Start with accuracy and repeatability
The first spec I check is not spindle horsepower. It’s whether the machine can repeatedly put the tool where the program expects it to be.
Standard 3-axis CNC mills achieve 0.01 mm positional accuracy and 0.005 mm repeatability, which is a 20 to 40 times improvement over manual machines. That level of control is especially important in GMP-aware medical manufacturing because consistent dimensions support safer processes, lower scrap, and more stable production, as shown in this CNC machine specification reference.
What those specs mean in practice
Positional accuracy matters when the machine moves to a commanded location. If the program calls for a tool center position, the machine needs to land there consistently across the travel range.
Repeatability matters even more in production. It tells you whether the machine can return to the same position cycle after cycle once the process is proven out.
If you’re running validated parts, repeatability reduces the chance that a machine drifts away from the approved first article. If you’re running general industrial work, it still matters because it stabilizes inspection results and reduces argument over whether the issue is setup, program, or machine behavior.
The rest of the buying decision
Other specs deserve attention, but they should be tied to actual parts and workflows.
| Specification | What to Look For (Prototyping & General Use) | What to Look For (Medical Device & Production) |
|---|---|---|
| Accuracy and repeatability | Stable, predictable performance for iterative work and mixed jobs | Strong repeatability to support validated processes and dimensional consistency |
| Work envelope | Enough X, Y, and Z travel for your largest planned part plus fixture space | Enough travel for fixtures, inspection access, and future family-of-parts expansion |
| Spindle capability | Flexibility across common materials and tool sizes | Controlled cutting conditions that support surface finish and process consistency |
| Control usability | Straightforward setup, program loading, and operator workflow | Reliable program management, traceable process control, and easier standardization |
| Tool capacity | Enough tool positions for common prototypes and short runs | Sufficient capacity to reduce interruptions during repeat production |
| Fixturing compatibility | Open table access for fast job changes | Rigid, repeatable workholding with clean validation-friendly setup methods |
Questions worth asking before you buy
- What parts are driving this purchase? A bracket family and a surgical instrument component don’t stress the same machine attributes.
- How often will setups change? High-mix shops need a table and control layout that support quick transitions.
- Who will run it? A good machine for one expert programmer may be a poor machine for a broader operator team.
- What inspection method supports it? If the process depends on frequent verification, leave room for probing strategy and gauge access.
Selection advice: Don’t buy to the hardest part you might someday quote. Buy to the recurring parts that will pay for the machine.
A machine that fits your real production pattern will outperform a more impressive machine that spends its life underused or fighting the wrong jobs.
Beyond Standalone Machines Integrating for ROI
The biggest mistake I see with a three axis milling machine is treating it as an isolated asset. A bare machine can cut parts. An integrated cell improves the business.
That difference matters because many manufacturers don’t need full automation. They need fewer manual touches, less setup disruption, better consistency, and a cleaner path from operator action to finished part.
A 2025 industry report noted that 60% of small manufacturers cite integration complexity as a primary barrier to automation. The same source points to targeted semi-automated solutions, such as pairing a 3-axis mill with custom fixtures, as a way to reduce labor dependency by 30% to 50% and downtime by 25%, according to this 3-axis CNC industry discussion.
Where ROI actually comes from
Most returns don’t come from buying more axes. They come from removing avoidable interruption around the cut.
That usually means improving one or more of these areas:
- Workholding: Operators stop indicating parts manually every cycle.
- Loading method: Parts locate positively instead of being “nudged” into place.
- Tool standardization: Tool lengths and offsets become repeatable across jobs.
- In-process verification: The machine checks reference surfaces or key locations before a bad cycle continues.
- Operator sequence: The process flows in a defined order instead of depending on tribal knowledge.
Examples of practical integration
A simple custom fixture can change the economics of a job. If an operator currently spends too much time aligning raw stock, a hard-stop fixture with repeatable clamping converts that setup into a loading step.
An integrated probe can do something similar for quality. It doesn’t replace final inspection, but it can confirm a feature location, work offset, or stock condition before the machine commits to the full cycle.
Neither change is glamorous. Both often outperform the idea of buying a more complex machine without fixing the process around it.
The best semi-automation projects remove routine judgment from the cycle. Operators should load, confirm, and run. They shouldn’t have to rediscover the setup every shift.
What works and what doesn’t
What works:
- Dedicated fixtures for recurring part families
- Quick-change jaws or nests for repeat jobs
- Documented setup standards tied to the control
- Tooling packages chosen around common materials
- Simple interlocks and sequence controls that prevent skipped steps
What doesn’t work:
- A generic vise strategy for every part
- Programs that only one programmer understands
- Fixture concepts that save time in CAD but frustrate operators
- Adding sensors and controls without simplifying the human workflow
- Trying to automate unstable part designs before the machining process is mature
Here’s a useful reference point if you’re evaluating how a production cell can be structured around a mill rather than around manual workarounds:
The right goal for small and mid-sized plants
Most shops don’t need lights-out automation as the first move. They need a process that scales one layer at a time.
That’s where the three axis milling machine is often at its best. It gives you a stable core. Then you build value around it with fixtures, guarding, probing, loading aids, part presentation, and standardized operator routines.
That kind of integration is usually easier to justify, easier to commission, and easier to maintain than a leap into machinery that solves the wrong problem.
When to Choose 3-Axis Over 4-Axis or 5-Axis Milling
There’s no value in pretending 3-axis is the answer for every part. It isn’t. Some geometries clearly belong on 4-axis or 5-axis equipment.
The question is simpler: does the part need rotational access, or are you about to pay for capability that won’t return value?
Choose 3-axis when the part is straightforward to approach
If the important features can be reached from the top, a three axis milling machine is usually the cleaner business decision. That includes many plates, housings, fixtures, brackets, covers, nests, and medical production components with prismatic geometry.
The main advantages are practical:
- Programming is simpler
- Setup is easier to standardize
- Operators train faster
- Troubleshooting is more direct
- Tooling and workholding stay less complicated
That last point matters more than many buyers expect. A machine can be technically capable and still become inefficient because every job demands a more delicate setup plan.
Move to 4-axis or 5-axis when setups become the problem
Sometimes the part can be done on 3-axis, but only with repeated reclamping, difficult datum recovery, or long tools reaching into awkward geometry. That’s when higher-axis equipment starts to make sense.
Use that capability when you need:
- Access to multiple faces without repeated repositioning
- Angled features that are inefficient to fixture manually
- Complex surfaces that need better tool orientation
- Reduced setup stacking on parts where alignment is critical
A practical comparison
| Machine type | Best fit | Main trade-off |
|---|---|---|
| 3-axis | Prismatic parts, top-access features, repeat production, fast programming | More setups on multi-face geometry |
| 4-axis | Parts needing indexed or rotary access around one axis | Added fixture and programming complexity |
| 5-axis | Highly complex surfaces, multi-angle access, fewer setups on difficult parts | Highest complexity in programming, operation, and justification |
Decision test: If your team spends more time managing setups than cutting material, more axes may help. If the part runs cleanly from one direction, 3-axis usually wins.
A lot of manufacturers overbuy because they evaluate machines by maximum capability instead of recurring workload. That often leads to slower adoption, harder training, and a more fragile process.
The smarter move is usually to reserve advanced machines for advanced geometry, and let 3-axis handle the broad middle of production where speed, repeatability, and simplicity generate the fastest return.
Maximizing Your Investment in Milling Automation
The most effective milling upgrade usually isn’t the most advanced machine in the catalog. It’s the system that fits your part mix, staffing reality, quality requirements, and budget discipline.
A three axis milling machine often sits in that sweet spot. It gives manufacturers a repeatable machining core without the programming burden and process overhead that come with more complex platforms. When that machine is paired with stable workholding, sensible tooling, clear setup standards, and integrated checks, it becomes a reliable production asset rather than just another spindle on the floor.
Keep the ownership picture realistic
Before approving a project, look beyond cycle time.
- Maintenance planning: A machine that runs consistently still needs preventive attention, clean workholding, and disciplined tool management.
- Safety design: Guarding, chip control, loading ergonomics, and operator sequence matter as much as spindle specs.
- Process documentation: Standard work, offsets, inspection plans, and fixture instructions are what turn machine capability into repeatable output.
The manufacturers that get the best return from milling automation don’t chase complexity for its own sake. They build processes that people can run consistently, quality can verify, and management can scale.
Frequently Asked Questions
Can a three axis milling machine be used in GMP-aware medical manufacturing
Yes, if the process is designed correctly. The machine itself is only part of the answer. The bigger factors are repeatable workholding, validated programs, controlled tooling, documented cleaning practices, and a clear inspection strategy. GMP-aware success comes from the full manufacturing method, not just the machine label.
Is retrofitting an existing mill better than buying new
Sometimes. A retrofit can make sense if the base machine is mechanically sound and the production need is focused on controls, fixtures, or process consistency. It’s a poor choice when the machine has fundamental rigidity, reliability, or support issues. The right answer depends on whether you’re upgrading a platform or trying to rescue a bad one.
What usually drives ROI on a semi-automated 3-axis cell
In most shops, the gains come from setup reduction, more predictable part loading, less operator-dependent adjustment, and fewer process interruptions. Buyers often focus first on spindle and speed. The better investment case usually comes from fixture design, sequence control, and easier inspection.
When is 3-axis the wrong choice
It’s the wrong choice when the part demands repeated reclamping that creates alignment risk, or when features require tool access from multiple compound angles. If the geometry fights the machine every step of the way, a simpler platform stops being the economical option.
What should operations teams review before starting a project
Review the recurring part family, current setup losses, operator workflow, inspection method, fixture concept, and expansion path. If those are defined early, the machine decision gets easier and the project reaches production with fewer surprises.
If you're evaluating how to turn a three axis milling machine into a practical production system, System Engineering & Automation can help. SEA designs cost-effective manufacturing solutions that combine machines, custom tooling, fixtures, integrated controls, and commissioning support to improve quality, throughput, and labor efficiency. If you need a GMP-aware upgrade, a semi-automated workstation, or a scalable production cell built around real operating constraints, SEA is a strong partner to assess the process and engineer the right level of automation.