You're probably dealing with this right now. A supplier sends over a tooling quote, your buyer forwards it, and everyone in the room asks the same question: How can a tool for this part cost that much?
That reaction is usually a sign that the team is treating tooling like a commodity purchase instead of what it is: a manufacturing decision that locks in cost, lead time, quality, and flexibility. If you're asking what are tooling costs, the useful answer isn't “the price of a mold or fixture.” The useful answer is that tooling cost is the price of committing your process to a specific way of making parts.
That's where we help manufacturers optimize production and services. The buyers who control tooling spend well aren't the ones who grind suppliers on price. They're the ones who simplify geometry, freeze revisions earlier, choose the right level of automation, and force clarity on what the quote includes.
Table of Contents
- Why Tooling Costs Catch Buyers Off Guard
- The Building Blocks of Every Tooling Quote
- How Process Type and Geometry Drive the Headline Number
- The Math Behind Cost Per Part at Different Volumes
- Budgeting for Tooling and Measuring Real ROI
- The Hidden Cost of Change Control and Rework
- Practical Ways to Reduce Tooling Spend
- Making Tooling a Strategic Investment Instead of a Surprise
Why Tooling Costs Catch Buyers Off Guard
A buyer approves a part at a competitive unit price, then the tooling quote lands at ten times what the team expected. The part did not change. The assumptions did.
That surprise usually comes from pricing the part before pricing the manufacturing decisions behind it. Teams build a quick model around piece price, machine time, and material, then treat tooling as a rough add-on. That is how you miss the items that drive the first quote and the painful revisions that follow. Tooling budgets swing hard based on choices you control early: geometry, tolerance strategy, fixture approach, revision discipline, and who builds the tool.
Why the spreadsheet misses actual costs
A standard cost sheet is good at recurring production cost. It is weak at estimating the work needed to make production repeatable.
What gets missed is predictable:
- Engineering time to turn a part print into a buildable, maintainable tool
- Complex machining created by shutoffs, deep features, tight access, or stacked tolerances
- Tryout and validation to get the process stable enough for release
- Revision risk when the design is still moving
- Secondary tooling such as gauges, nests, handling aids, and check fixtures
Buyers get blindsided when they budget steel, aluminum, and shop hours, but leave out design time, prove-out, and change risk.
This is why two suppliers can quote the same part with a wide gap and both be rational. One is pricing a stable program with clean assumptions. The other is pricing the mess they expect to inherit.
What you control
The biggest tooling cost drivers are rarely hidden. They are usually buyer and engineering decisions made before steel is cut.
- Tolerance strategy. Tighten only the dimensions that affect fit, function, or safety. Blanket precision drives tool complexity fast.
- Fixture concept. A dedicated, highly automated fixture can save labor at volume and waste money on a lower-run program.
- Surface finish and cosmetic requirements. Every polished face, critical texture, or protected show surface adds labor and inspection burden.
- Change discipline. Late design changes are one of the fastest ways to turn an ordinary tool into an expensive one.
- Supplier selection. The low quote is often low because key work is excluded, not because the builder found magic savings.
The same part can land near $8,000 or $80,000 depending on those calls. That is the point buyers miss. Tooling cost is the price of committing your process to a specific method of making the part, at a specific quality level, with a specific amount of flexibility left in reserve.
If you want fewer tooling surprises, stop asking whether the quote is high. Ask which design and process decisions made it high, and whether they are worth keeping.
The Building Blocks of Every Tooling Quote
You approve a tool at a price that seems reasonable. Three weeks later, the supplier sends questions about inspection nests, wear components, fixture details, and extra sampling. Now the quote is higher, lead time is longer, and everyone acts surprised. They should not be.
A tooling quote gets easier to control once you break it into cost buckets and force the supplier to show what is included. Buyers who focus on the total miss the decisions that move the number. Buyers who press on scope, fixture strategy, and iteration assumptions usually find the savings.
The cost buckets that matter
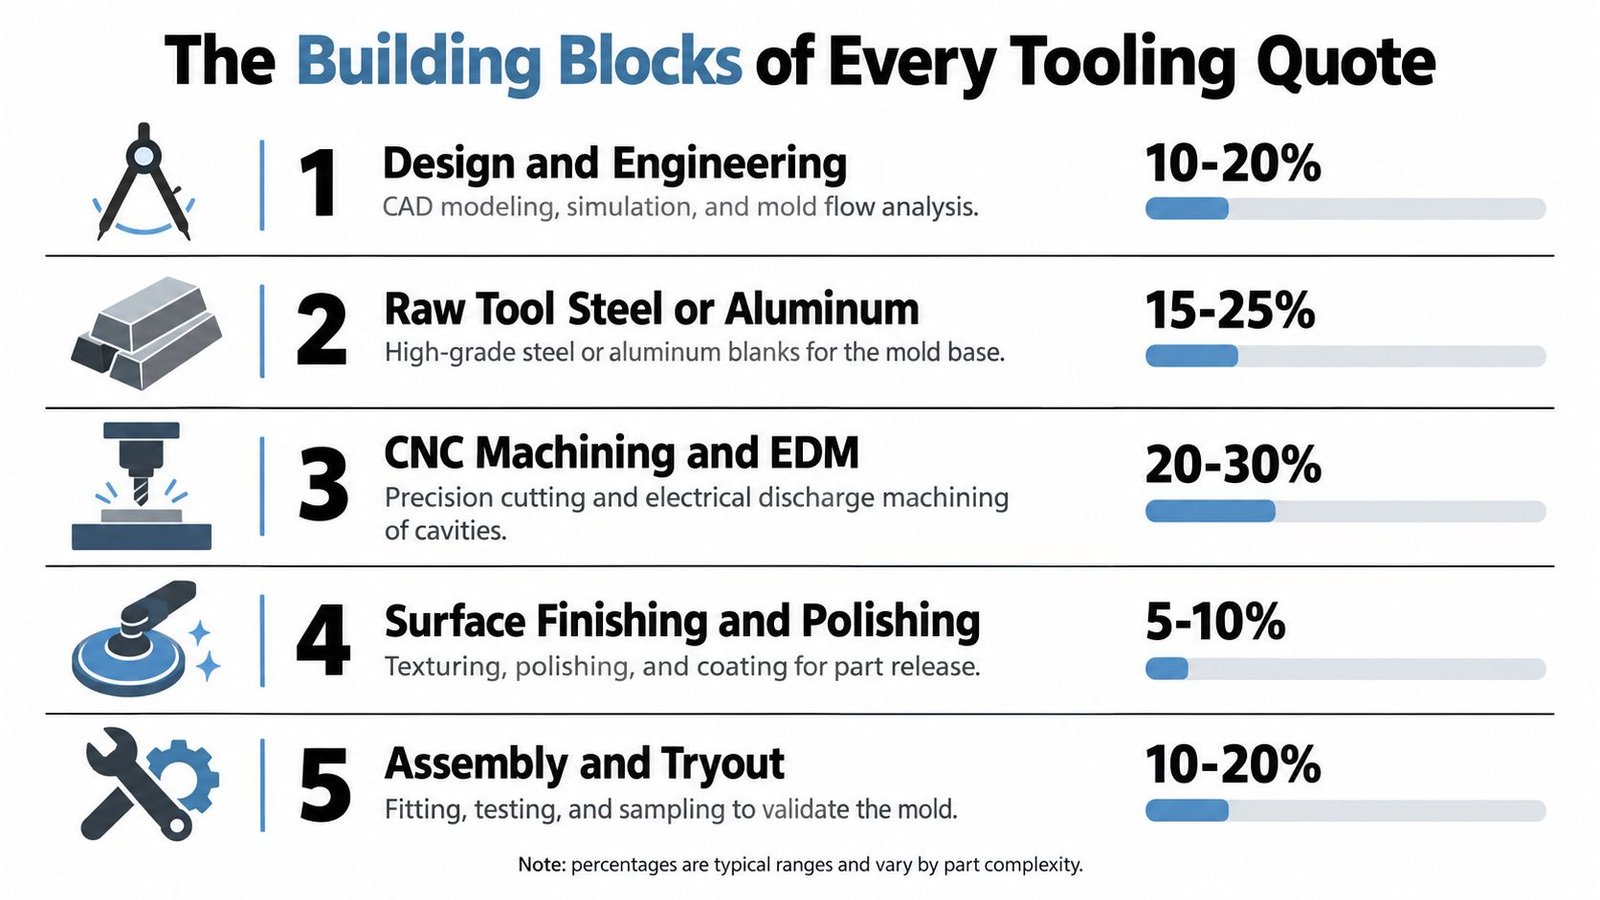
Most tooling quotes come down to five line items.
Design and engineering
This covers CAD work, tolerance review, draft and release checks, stack-up risk, and process decisions that should be settled before steel is cut. If the print is immature, this bucket expands first.Tool material
Material matters less than many buyers assume. The cost changes with tool size, expected life, wear surfaces, and whether the tool needs hardened areas or specialty alloys.CNC machining and EDM
Geometry starts charging rent. Deep pockets, thin ribs, tight internal corners, undercuts, hard-to-reach features, and fine surface requirements all add machine time.Trials, fitting, and iteration
Honest quotes include prove-out work. Weak quotes hide it, then recover the money through change orders, delayed samples, or quality drift during launch.Assembly and hardware
Locators, clamps, bushings, ejector systems, side actions, lifters, and runner hardware can push a quote up fast. This bucket grows when the part design forces the tool to compensate for poor manufacturability.
That last point matters. Many tooling overruns are not caused by steel prices. They come from design choices that force more machining, more fitting, and more debugging.
The line items buyers forget to ask about
The primary tool is only part of the spend.
Production often needs inspection nests, gauges, handling fixtures, poka yoke devices, or operator aids to hold repeatability on the floor. If those items appear after tool approval, your budget was wrong from the start. A lot of custom fixture design and manufacturing gets approved late because nobody defined the full production method early enough.
Here is the rule: if the part cannot be loaded, located, clamped, checked, and released the same way every cycle, the tooling scope is incomplete.
That is one of the biggest buyer-controlled cost decisions in the whole project. A smart fixture plan can keep a tool simple. A bad fixture plan forces complexity back into the tool, where every change costs more and takes longer.
Why the spreadsheet misses actual costs
Spreadsheets capture quoted price. They usually miss scope quality.
Two suppliers can show similar totals and sell very different levels of readiness. One includes tryout time, replaceable wear details, basic gauges, and revision protection. The other includes the minimum required to get a purchase order issued. The cheap quote wins the meeting and loses the launch.
This is why line-item clarity matters more than small percentage concessions. Saving a little on the base quote means nothing if you buy rework, schedule slip, and weeks of engineering churn.
What you control
If you want the lower end of the cost range for a given part, control these decisions early:
- Freeze the revision before release. Tooling started on unstable geometry gets expensive fast.
- Tighten only functional tolerances. Broad precision drives more complex machining and inspection than the part usually needs.
- Match the fixture plan to volume. Do not buy a high-automation fixture for a program that does not justify it.
- Define cosmetic requirements clearly. Show surfaces, textures, and protected faces add labor in both toolmaking and inspection.
- Ask what is excluded. Exclusions are where low quotes hide risk.
A better checklist before you sign
Run every tooling quote through this filter:
- What revision is the quote built to?
- What is included in tryout, sampling, and prove-out?
- Which wear items are standard and replaceable?
- What support fixtures, gauges, or operator aids are excluded?
- What design changes trigger a new quote instead of a modification?
A tooling quote is not just a price. It is a statement of how much uncertainty still sits in the job. The buyers who keep tooling budgets under control are the ones who force that uncertainty into the open before release.
How Process Type and Geometry Drive the Headline Number
Two buyers can source the same part and get tooling quotes that are nowhere near each other. One lands near the low end. The other approves a tool that costs ten times more and takes weeks longer to build. The difference is usually not supplier greed. It is process choice, geometry, and how much complexity the buyer allowed into the part before RFQ.
Start with the process, because that decision sets the cost structure fast. Injection molding, stamping, and die casting all punish complexity in different ways. Injection molds get expensive when the part needs side actions, lifters, hot runners, or high-cosmetic surfaces. Stamping dies climb when the part needs more stations, tighter datum control, or aggressive forming. Die casting dies get expensive when thermal loads, slides, and surface requirements pile up at the same time.
For injection molding, benchmark pricing shows a wide spread. Prototype aluminum molds can sit in the lower range, while hardened steel production molds and complex multi-cavity tools can climb sharply, especially once side actions, lifters, and hot runners enter the design (Jaycon injection molding benchmarks).
The mistake is treating geometry as a detail after the process is chosen. Geometry is the quote.
A part with undercuts, deep ribs, thin walls, polished show surfaces, and stacked datums does not behave like a simple version of the same part. It often needs more tool components, more machining time, more tryout work, and a tighter processing window in production. If one supplier expects heavy EDM machining cost because your shutoffs and corners are difficult to machine conventionally, and another supplier pushes for cleaner geometry, those quotes should not match.
Here are the features that push tooling cost up fastest:
- Undercuts force side actions, lifters, or secondary operations
- Thin walls reduce process margin and raise toolmaking precision
- Deep ribs increase machining difficulty and raise filling and warp risk
- Mirror or cosmetic finishes add polishing, protection, and validation work
- Stacked datums force precision across features that may not affect function
- Multi-cavity layouts raise complexity far beyond a simple cavity count increase
If you want the lower headline number, change the part before you argue about the quote.
Stamping follows the same rule, just with different failure points. A simple blanking tool is one budget. A progressive die with multiple stations, special hardening, coatings, and tight feature relationships is a different budget entirely. Balford's tooling guidance also notes that lead times typically grow with die size, station count, and added treatments, with tooling often quoted in weeks rather than days (Balford stamping tooling lead times).
The practical takeaway is simple. Buyers do not control steel prices or machine rates. They do control whether a part needs slides, extra stations, premium finishes, heroic tolerances, and complex fixturing. Those decisions decide whether the tool lands closer to $8,000 or $80,000.
The Math Behind Cost Per Part at Different Volumes
Tooling doesn't become economical because someone says it will. It becomes economical when your forecast supports it.
In injection molding, the per-part tooling burden is often modeled as total mold cost divided by production volume, because the fixed cost is amortized across output (DFMA injection molding cost model). That's simple math, but teams still misuse it because they plug in optimistic volume and ignore product life.
Cost Per Part at Different Volumes
| Scenario | Annual Volume | Lifecycle Years | Tooling Cost/Part |
|---|---|---|---|
| Short-run program | 5,000 units | 1 year | $10 |
| Mid-volume program | 50,000 units | 1 year | $1 |
| Long-life high-volume program | 500,000 units | 1 year | $0.10 |
A fixed tool cost spread over low volume is painful. The same tool spread over sustained output is barely noticeable. That's why total manufacturing cost has to be evaluated as tooling plus unit cost times quantity, plus secondary operations and logistics or quality risk, not as tooling in isolation (Fictiv manufacturing cost comparison).
The forecast matters more than the formula
If your sales forecast is soft, don't buy production tooling just because the unit economics look beautiful at mature volume. If the design may change, don't amortize over a lifecycle that likely won't happen.
A good operations review asks three questions:
- How many parts will we make?
- For how long will this revision survive?
- What happens if ramp is slower than forecast?
You can pressure-test those assumptions with a simple production cost analysis before you commit to hard tooling. That work is less exciting than cutting steel, but it prevents expensive optimism.
Budgeting for Tooling and Measuring Real ROI
Tooling belongs in your budget as NRE, not as a blurry overhead line. If you don't recover it deliberately, it will distort every margin discussion later.
What should be in the budget
Your tooling budget should include more than the primary build:
- Core tool cost
- Support fixtures and gauges
- Sampling and validation effort
- Engineering changes already under discussion
- Launch timing exposure if tooling slips
That matters because steel mold fabrication for injection molding or die casting can take 4 to 12 weeks, which means tooling affects delivery timing as much as it affects capex (Fictiv on tooling lead-time impact). If launch timing matters, lead time is part of ROI.
How to judge whether the spend makes sense
Use practical decision criteria, not finance theater.
If the design is stable, the product has a credible multi-year life, and the volume supports recurring production, tooling usually makes sense. If the design is still drifting or the process is still being discovered, hard tooling is often premature.
Tooling pays back when it removes enough labor, variation, or secondary handling to matter across the actual life of the product.
A useful internal review covers:
Recovery path
Decide whether the business recovers NRE through piece price, a separate program charge, or internal capital treatment.Breakeven logic
Compare the tooled process against the current alternative. If the alternative is manual assembly, outsourcing, or repeated soft-tool work, the comparison should include labor burden, defect exposure, and schedule risk.Payback discipline
Don't rely on best-case demand. Use a realistic production case, then test a lower-volume case that management can still live with.
The teams that manage tooling well are ruthless about one thing. They don't approve a tool because it feels necessary. They approve it because the numbers and the process both hold up.
The Hidden Cost of Change Control and Rework
Friday afternoon, purchasing releases a tool. By Tuesday, engineering updates the print and calls the change minor. The supplier then sends a change-order request for insert work, fixture changes, another sampling round, and added lead time. That is how an $8,000 tool starts acting like an $18,000 tool.
The expensive mistake is not the change itself. It is releasing tooling before the design, datums, and interface assumptions are stable.
Once steel is cut, every revision has to be translated into manufacturable geometry, clear tool access, workable shutoffs, and a repeatable inspection method. A small wall change can force insert rework. A datum move can force fixture redesign. A feature shift can trigger another qualification cycle. In regulated or GMP-aware programs, that same revision can also drag documentation, traceability, and validation work behind it. SourcingAll's guidance on hidden tooling costs and revision exposure gets the buying question right: define exactly what the tooling charge covers, which revision it matches, and who pays if the print changes.
Control the exposure before the PO goes out.
How to keep revisions from blowing up the budget
Build the tool around the areas likely to move, not around the fantasy that nothing will change.
- Use modular inserts for details that are still likely to change, such as ports, mounting features, shutoffs, or cosmetic surfaces
- Choose adjustable fixturing where mating conditions or interface locations may shift during line validation
- Set datums with discipline so the tool references what function depends on, not whatever was easiest to dimension
- Prove fit and handling early with prototypes or soft tools before approving hard-tool steel
- Separate cosmetic requests from functional requirements so preference changes do not trigger expensive rework
The right question is simple. Where will this part change first, and did we make that area cheap to modify?
A flexible tool usually costs more up front and less over the life of the program. That trade-off is worth making when the product is still settling, the line is semi-automated, or the program mix is high. Buyers who manage tooling well do not just negotiate the initial quote. They force revision discipline, ask for modularity where it matters, and stop paying to machine uncertainty into hardened metal.
Practical Ways to Reduce Tooling Spend
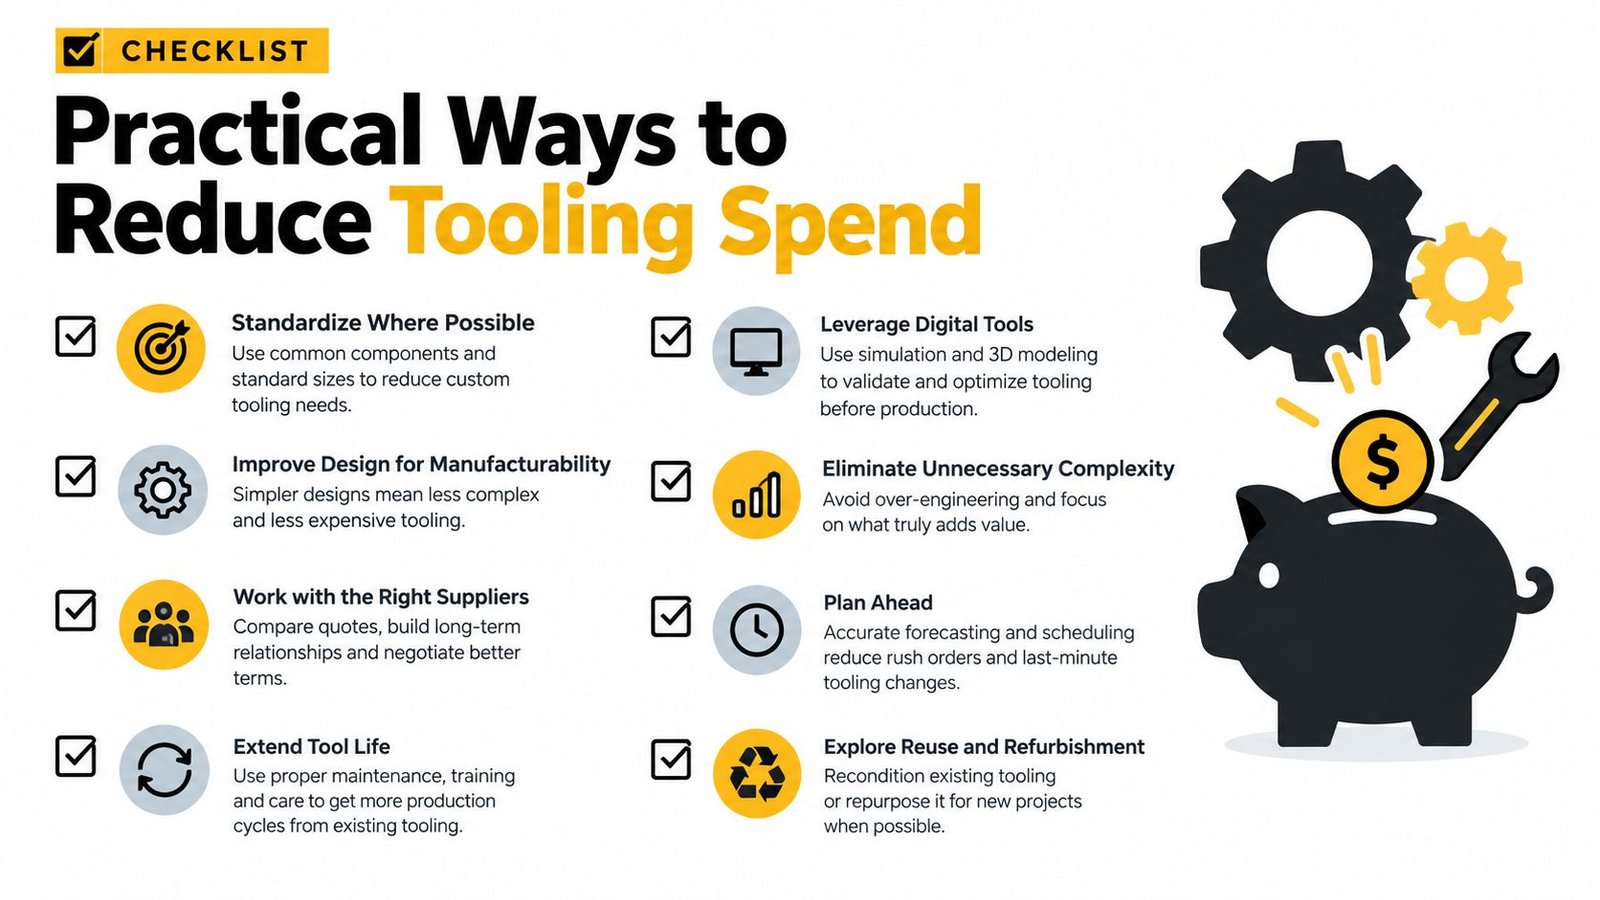
If you want lower tooling cost, attack the decisions with the biggest impact first. Don't start by haggling over shop rate. Start by removing the reasons the supplier had to quote high.
Start with geometry, not procurement
Most savings come from simpler parts.
Uniform walls, reasonable radii, accessible features, sensible draft, and fewer undercuts reduce machining difficulty and process sensitivity. If the part only works with heroic tooling, the part needs another design pass.
Standardize what doesn't need to be custom
Custom everything is a lazy engineering habit.
Use standard inserts, common die sets, replaceable wear components, modular clamping, and off-the-shelf sensor or control hardware where possible. Save custom design effort for the surfaces and functions that differentiate your process.
Here's the pre-PO sequence I recommend:
Lock the design
Freeze the revision that matters. Don't release tooling against a print everyone knows is moving.Validate with a prototype
Use prototype parts, soft tools, or printed surrogates to test fit, handling, and assembly interactions before committing to hard tooling.Right-size the automation
Full automation isn't always the smart move. Semi-automatic or even manual-assisted tooling can be the better answer when demand is uncertain or change frequency is high.Split the quote intelligently
Negotiate primary tooling, fixtures, gauges, and validation scope as separate cost discussions so you can see what's essential and what's optional.Choose a supplier that challenges the print
If a vendor just prices the drawing without pushing back on manufacturing risk, that vendor may be easy to buy from and expensive to own.
Pick a partner who can engineer to budget
Operations teams should be blunt. You don't need a supplier who says yes to everything. You need one who can explain the trade-offs between a simpler fixture, a more durable tool, a semi-automatic station, and a fully automated one. One option in that space is System Engineering & Automation, which provides custom tooling, fixtures, semi-automatic systems, and integrated controls for manufacturers that need to balance budget, flexibility, and production goals.
Cheap tooling is only cheap if it supports throughput, quality, and maintenance without constant intervention.
If you're trying to optimize production and services, that's the lens to keep. Focus on total landed performance, not just the line item on the first quote.
Making Tooling a Strategic Investment Instead of a Surprise
A tooling project goes off the rails in a familiar way. The first quote looks manageable. Then the fixture count grows, validation gets added, revisions keep coming, and the tool you approved for launch no longer matches the part, the volume, or the line. The result is not bad luck. It is a buying process that let key decisions drift until the expensive options were the only options left.
Tooling stops being a surprise when the buyer owns the variables that move the number. Those variables are not hidden. Part geometry, process selection, fixture strategy, expected life, revision control, and supplier behavior determine whether the same part lands closer to $8,000 or $80,000.
The biggest-budget-impact decisions happen before the PO
By the time a tooling quote is ready for approval, most of the cost is already baked in. If you want lower spend without creating quality problems later, push hard on these decisions early:
- Choose the process for the production plan. Do not buy production tooling around forecast optimism, temporary demand spikes, or vague automation goals.
- Simplify geometry before release. Tight tolerances, cosmetic surfaces, undercuts, and hard-to-access features raise tooling difficulty fast.
- Separate required tooling from support items. Main tool, fixtures, gauges, end-of-arm tooling, and validation assets should not be buried in one lump sum.
- Match tool durability to actual product life. Overbuilt tooling burns capital. Underbuilt tooling burns uptime.
- Lock revision and acceptance scope in writing. If the freeze point, trial expectations, and modification rules are fuzzy, the final cost will not stay close to the quote.
Disciplined buyers win. They do not just ask what the tool costs. They ask which design choice, fixture choice, or validation assumption is making it cost that much.
Five questions to ask before signing a tooling PO
Take one active tooling job and run this review before approval:
| Review Question | What to look for |
|---|---|
| Is the part revision actually frozen? | Open design changes usually turn into tool rework, schedule slip, or both |
| Does the quote break out fixtures, gauges, and validation? | If those items are blended together, you cannot control scope or compare options cleanly |
| Is the tool built for the volume you will really run? | If the tool is sized for the wrong demand profile, your ROI model is wrong from day one |
| Has the supplier challenged any costly geometry or tolerance calls? | If not, you may be paying for drawing complexity that adds no production value |
| Are modification terms clear after first samples and buyoff? | If not, the lowest quote can become the most expensive one after launch |
Good tooling buyers act like owners of future production, not shoppers comparing a single line item. They force clarity early, contain iteration, and buy the simplest tool that can hit throughput, quality, and maintenance targets.
If you need a second set of eyes on an active tooling quote or a production concept that is drifting toward overbuild, System Engineering & Automation can help sort out fixture strategy, tooling scope, and automation level before costs harden. We work with manufacturers that need practical engineering support to optimize production and services without adding hidden complexity.