You're probably dealing with some version of the same pressure every plant faces. Output needs to improve. Labor is tight. Quality issues keep showing up in the same station. Someone suggests automation, a new fixture, or a machine upgrade, and the obvious question follows: will it solve the actual problem, or just give you a more expensive one?
That's where the engineering design process earns its keep. In manufacturing, it isn't a classroom diagram or a paperwork exercise. It's a disciplined way to make better decisions before steel gets cut, controls are programmed, or a line goes down for installation. If you've ever seen a project miss the mark because requirements were vague, testing came too late, or the system was overbuilt for the application, you've already seen what happens when the process is skipped.
Table of Contents
- The Blueprint for Manufacturing Success
- Understanding the Engineering Design Process Core Stages
- Applying the Process in Manufacturing Automation
- A Medical Device Automation Case Study
- Common Pitfalls and How to Avoid Them
- Measuring Success with Key Performance Indicators
- Making the Design Process Your Competitive Edge
The Blueprint for Manufacturing Success
A lot of failed projects start with the wrong first move. A team buys equipment before they define the problem. They focus on what the machine can do instead of what the operation needs. Then they spend months working around avoidable gaps in throughput, ergonomics, maintainability, or compliance.
That's why asking what is engineering design process matters in a manufacturing context. The useful answer isn't academic. It's operational. The process gives you a repeatable framework for deciding what to build, how much automation makes sense, and what tradeoffs you can live with.

Most simplified explanations stop at a clean loop of define, brainstorm, prototype, and test. That's incomplete for plant reality. As Lumitex's discussion of real-world engineering design tradeoffs points out, mainstream explainers rarely address safety, regulatory constraints, budget, and time-to-commission. For manufacturers, that omission is a problem because the harder question usually isn't what the steps are. It's how to choose the right level of automation under constraints.
Why this matters in practice
On the factory floor, every design decision has consequences:
- A faster concept might create awkward loading for operators.
- A lower-cost build might increase changeover time.
- A fully automated cell might reduce flexibility for a mixed-product line.
- A quick retrofit might solve today's bottleneck while creating maintenance headaches later.
Practical rule: If the team can't state the problem in measurable operational terms, they're not ready to buy hardware.
A structured process forces these issues into the open early. It also creates traceability. When a prototype fails, when production asks for a change, or when quality adds a requirement, the team can work backward through documented decisions instead of arguing from memory.
The value is simple. A disciplined design process reduces rework, shortens painful commissioning cycles, and improves the odds that the final solution fits the line, the budget, and the people who have to run it every shift.
Understanding the Engineering Design Process Core Stages
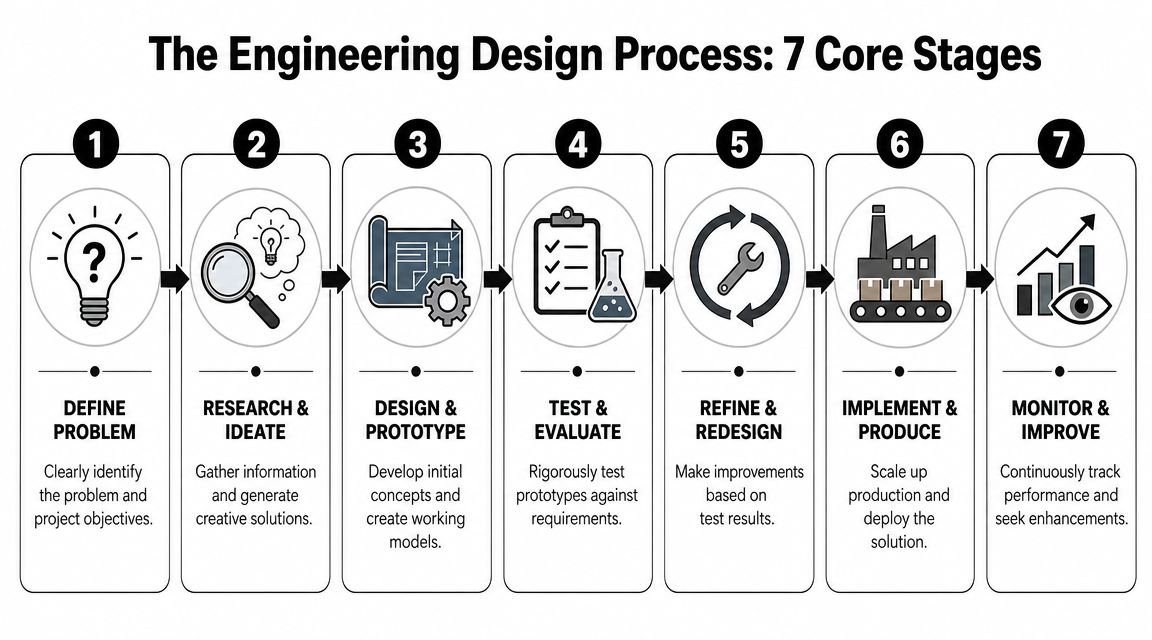
The engineering design process is widely described as a 7- to 9-step iterative cycle that includes identifying the problem, researching, defining requirements and constraints, brainstorming, selecting a solution, building a prototype, testing, and improving or communicating results, with modern descriptions emphasizing that the process is not linear and often loops back after testing, as outlined in the Wikipedia overview of the engineering design process.
Why the process matters on the factory floor
In manufacturing, those broad steps usually get translated into project phases that teams can act on. Think of a custom fixture for an assembly line. You're not just trying to “design a fixture.” You're trying to hold a part consistently, improve operator motion, avoid damage, fit existing space, support cleaning requirements if needed, and keep build cost in line with expected savings.
That's why experienced teams break the work into clear stages. Each stage answers a different business question.
A practical example helps. If operators are manually aligning a part before fastening, the symptom is slow cycle time. The actual problem may be poor part presentation, inconsistent incoming orientation, or a fixture that allows too much variation. Different causes lead to very different solutions.
For teams planning larger projects, this same logic applies to full automation systems design services. The sequence matters because each decision builds on the last one.
A short visual explanation is useful before getting into the details.
The seven stages in practical terms
Define the problem
Start with the production issue, not the preferred technology. Is the problem throughput, ergonomics, scrap, traceability, downtime, or operator variation? Good problem statements are specific enough to guide design choices.Research the current state
Observe the station. Review part flow, operator motions, quality holds, maintenance concerns, and upstream variation. In many plants, during this process, hidden constraints become evident.Set requirements and constraints
This stage turns vague goals into decision criteria. Required cycle time, available footprint, safety expectations, utility availability, budget range, validation needs, and integration points all belong here.Generate concepts
Don't jump to one answer. Compare manual aids, semi-automatic options, and fully automated concepts. Early alternatives often reveal that a simple fixture or poka-yoke feature can solve what looked like a robotics problem.Develop and prototype
Prototypes can be physical, digital, or both. A quick mockup, sample fixture plate, sensor trial, or controls simulation can expose weaknesses before full build.Test and verify
At this stage, the concept meets reality. Does it hit the cycle target? Can operators load parts reliably? Does the sensor behave consistently with real variation? Verification checks whether the design meets the defined requirements.Validate and hand off to production
A design that works in engineering still has to work in production. Handoff includes training, documentation, spare parts planning, maintenance input, and confirmation that the solution performs in its real operating environment.
The strongest designs survive contact with actual operators, actual parts, and actual shift conditions.
Why iteration is a strength, not a delay
Managers sometimes hear “iterative” and think “slow.” In practice, iteration is what prevents late-stage failure.
If testing shows a gripper marks the part, that isn't a setback. It's useful information. If operators struggle with access during a pilot run, the team should go back and revise the layout. If validation identifies a missing interlock or documentation gap, the process is doing its job.
A linear project assumes the first idea will hold up untouched. Manufacturing projects rarely work that way. The better approach is controlled iteration, where each loop gets the design closer to a reliable production result.
Applying the Process in Manufacturing Automation
A common automation scenario
Take a manual assembly station where an operator picks a component, aligns it by hand, activates a press, and performs a visual check. The station works, but it's inconsistent. Cycle time drifts from operator to operator. Misalignment causes rework. Training new staff takes longer than it should.
This is a typical starting point for automation. Not full lights-out automation. A focused project to remove variability and improve output without making the station rigid or expensive.
A team might begin by defining requirements around part alignment, operator safety, ease of loading, and acceptable cycle time. Then they observe the station across multiple runs to identify where variation enters the process. In many cases, the biggest issue isn't pressing force. It's how the part is presented before the press cycle starts.
How the decisions unfold
The next move is concept development. One path might be a simple locating fixture with hard stops and a presence sensor. Another might add a pneumatic clamp and a two-hand start. A third might include a vision check before the cycle begins. Each option changes cost, complexity, and flexibility.
That's where discipline matters. Teams compare concepts against the original requirements instead of chasing features. If the operation has frequent part changes, a highly rigid design may create more trouble than it solves. If the line needs modest improvement and low disruption, a semi-automatic station may outperform a larger system on real ROI.
A practical prototype could be as simple as a sample fixture, a printed nest, or a temporary sensor setup to confirm orientation logic. Those small tests reveal whether the concept is forgiving enough for real operators and real parts.
From there, the project moves into detailed design, controls integration, and production preparation. For manufacturers that need purpose-built equipment rather than off-the-shelf machinery, custom designed machinery often becomes the right path when process requirements, footprint limits, and operator interaction all need to be designed to fit together.
A good manufacturing automation project doesn't just automate motion. It clarifies the process. It decides what the operator should still do, what the machine should control, and what quality checks should be built into the station instead of left to chance.
A Medical Device Automation Case Study
Where the stakes change
A medical device assembly project uses the same design logic, but the tolerance for ambiguity is much lower. The process still starts with requirements, concept evaluation, prototyping, testing, and implementation. What changes is the level of documentation, traceability, and verification required before the equipment is accepted for production use.
Consider a device assembly step that involves precise component placement, controlled pressing, and lot traceability. A simple “it seems to work” standard won't hold. Engineering has to define how the machine confirms part presence, how the process prevents incorrect loading, how operators interact with alarms, and how records are captured when quality needs evidence later.
In regulated manufacturing, undocumented decisions become expensive decisions.
That affects design choices early. Controls architecture, sensor strategy, HMI prompts, recipe management, and data capture all need forethought. Even fixture materials and access for cleaning or maintenance can become significant.
How validation shapes the design
Testing in this environment goes beyond basic function checks. Teams still verify that the machine performs as intended, but they also prepare for formal validation activities such as IQ, OQ, and PQ. Those activities change how drawings are released, how software revisions are controlled, and how test protocols are written.
A practical example makes the point. Suppose an engineering team prototypes a feed method that works well mechanically but doesn't support clear rejection handling or consistent traceability at the station. In a less regulated setting, the team might accept that compromise and train around it. In medical device production, that's risky. The design needs to support the process requirement directly.
This is also where cross-functional input matters most. Quality, production, maintenance, and validation teams all need visibility before the machine is finalized. If maintenance can't access a critical component safely, or if quality can't confirm process status easily, the problem should be corrected before release.
The result is a more rigorous version of the same core process. Define clearly. Prototype carefully. Test against real requirements. Document every meaningful change. Hand off only when the equipment is ready not just to run, but to run under controlled conditions that support compliance and product quality.
Common Pitfalls and How to Avoid Them
Where projects go sideways
Most manufacturing design problems don't come from lack of effort. They come from preventable mistakes made early.
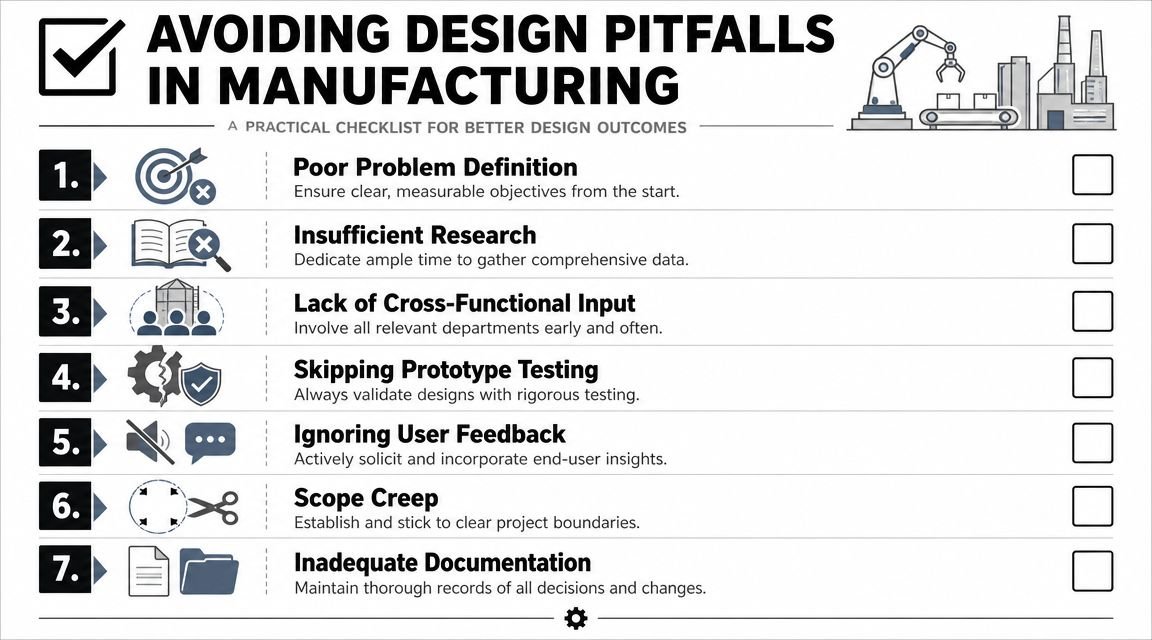
The first is poor problem definition. Teams say they need automation when what they really need is better part control, safer loading, or more consistent inspection. If the root issue is unclear, the project can look busy for months and still miss the target.
The second is over-engineering. Plants sometimes buy more automation than the process can justify. A fully automatic cell sounds efficient, but if product mix changes often or demand is uneven, a simpler semi-automatic solution may produce better operational results with less complexity.
Other recurring issues show up in nearly every plant:
Scope creep
Small add-ons accumulate until the original schedule and budget no longer fit the job.Late operator input
A station may work on paper and still frustrate the people running it every day.Weak documentation
Without clear requirements and revision history, teams struggle when changes come up during build or commissioning.Compressed testing
When deadlines tighten, testing is often the first thing cut. That usually just moves the pain to startup.
Field lesson: The cheapest time to find a design mistake is before fabrication. The second cheapest time is before commissioning. After that, cost rises fast.
How modern tools reduce risk
Recent engineering literature has highlighted how teams use simulation, connected data, and fast feedback loops to reduce physical prototyping, especially when automation decisions need to be validated quickly and capital is limited, as summarized in the Santa Clara University engineering design process guide.
That shift matters for smaller plants and staged automation projects. You may not want to build multiple full physical trials just to answer basic design questions. Digital reviews, controls simulation, motion studies, and early sensor testing can reduce uncertainty before major spend.
A practical prevention checklist helps:
| Pitfall | Better approach |
|---|---|
| Undefined requirements | Write measurable acceptance criteria before design begins |
| Too much automation | Compare manual, semi-automatic, and automated concepts side by side |
| Limited user feedback | Include operators, maintenance, and quality in reviews |
| Testing left to the end | Plan prototype and verification checkpoints early |
Good projects don't avoid change. They control it. That's the difference.
Measuring Success with Key Performance Indicators
Tie technical work to business outcomes
A design project is successful only if it improves plant performance in a way leadership can see. That's why KPIs should be defined at the start, not after installation.
If the original problem was slow manual handling, the KPI might be cycle time. If defects were the main issue, first pass yield may matter more. If the machine is part of a larger line, OEE, downtime patterns, and response time to faults may be the better indicators.

Useful KPIs for automation projects
The right KPI set depends on the process, but these are usually the most practical:
- Cycle time measures whether the new method increased output potential.
- First pass yield shows whether built-in controls reduced variation and rework.
- Downtime by cause reveals whether the equipment is reliable or just faster when everything is ideal.
- Labor utilization helps teams understand whether automation reduced manual burden or shifted it.
- ROI connects the engineering decision to the business case that justified the project.
For many plants, data collection is the weak link. A team installs a better station but can't prove what changed because the before-and-after data isn't reliable. That's where machine monitoring software can support the process by capturing runtime, stoppages, and production behavior in a more usable format.
The key point is simple. If a project can't be measured, it can't be managed well. Define success early, instrument the process where needed, and review actual results after launch instead of relying on assumptions.
Making the Design Process Your Competitive Edge
The engineering design process is more than a sequence of technical tasks. In manufacturing, it's a way to control risk, protect capital, and make sure improvement projects solve the right problem before they consume time and money.
Plants that use the process well don't just build machines. They make sharper decisions about requirements, operator interaction, validation needs, maintainability, and the right degree of automation for the business. That's where efficiency gains become sustainable instead of temporary.
For manufacturers evaluating new tooling, semi-automatic stations, integrated controls, or regulated production equipment, working with a partner that can handle design, build, installation, and commissioning within one structured workflow often reduces friction. System Engineering & Automation provides that kind of end-to-end manufacturing support, including custom equipment, tooling, controls integration, and GMP-aware project execution.
If you're planning a line upgrade, fixture redesign, or automation project, talk with System Engineering & Automation about the production goals, constraints, and tradeoffs in front of you. A disciplined design process turns those variables into a practical solution that fits your operation instead of forcing your operation to fit the equipment.